The ordeal of always having saved data
It’s clear that when we talk about data, the first thought that comes to mind is whether we have a BACKUP somewhere. Whether it’s photos, videos, or simple documents doesn’t matter: “Did you save them?”
For personal use, there are countless solutions—from simple USB stick copies to various cloud services offered by well-known platforms.
But how does it work in companies?
Over the years, I’ve seen a wide variety of solutions: On-premise setups that require regular maintenance and cyclic checks of backed-up data through recovery (hopefully). Expensive and centralized backup software with fancy dashboards and progress bars showing the data backup process. And then there are more or less efficient homemade scripts that move data from one directory to another, zipping them into date-numbered archives.
In short, the ways companies safeguard their data are closely tied to the following factors:
- Software usability
- Budget
- Resources, in terms of the time dedicated professionals spend maintaining everything
Those in charge understand that neglecting backups is like attempting to cross a busy highway, hoping to avoid oncoming traffic. For years, I, too, underestimated the importance of having data readily accessible when restoration was needed—and, above all, ensuring that it remained completely intact.
For those, like me, who grew up with open-source tools, finding THAT tool or THAT software on GitHub that meets your needs is immensely satisfying. So, we spend days browsing Reddit and Hacker News, searching for the perfect tool. You try it, and again, you’re disappointed. Why? Because it’s not centralized, doesn’t support incremental backups, or maybe it’s a tool that hasn’t been updated in years, making you hesitant to install it on one of your new servers.
I know it’s happened to you too! Don’t lie…

From problem to choice
Now let’s play a game. A kind of problem-solving exercise like in school:
“You have a hybrid infrastructure between local machines in your company and VPS elsewhere. Your physical servers, virtual machines, and containers are diverse. (For today’s problem, let’s focus on the local network, excluding VPS.) How would you practically structure a backup system that solves all your issues?”
I’ve asked myself this question often, changing and rethinking my strategy… And then I discovered Restic. For those unfamiliar, Restic is a backup software written in Golang, open-source, based on creating encrypted repositories and offering a wide range of backends (destinations where data will be saved), from a simple network folder to Amazon S3, Backblaze, and Google Cloud Storage.
There are several things I liked about Restic:
Ease of configuration: CLI tools are often tedious to script because they have many inline parameters, and if you revisit those scripts years later, you don’t remember how you configured a certain thing. I don’t know about you, but I like being able to read and understand immediately what to do, especially in situations where data needs to be recovered “yesterday.”
Encryption: Restic uses:
- AES-256 in CTR mode (Counter Mode): AES-256 for symmetric data encryption in CTR mode, which allows for efficient and secure encryption, though it does not provide data authentication.
- Poly1305: for authenticating encrypted data, used alongside AES-256-CTR to ensure both encryption and data integrity.
- HMAC-SHA256: ensures that metadata hasn’t been altered.
- Scrypt: Instead of PBKDF2, the Scrypt algorithm is used to derive cryptographic keys from the user’s password. Scrypt is designed to resist brute-force attacks and makes password cracking more difficult with high memory and computational requirements.
REST Server: An HTTP/HTTPS server to use as a backend or repository container. I was particularly pleased with the idea of using it to back up any machine, avoiding some compatibility issues across operating systems. In the typical configurations I’ve encountered, a different method is used for Linux systems compared to Windows to “connect” to the data. This is because, natively, Windows Server lacks tools like
rsyncand even basic utilities such asssh. Only in more recent versions (since version 2019) has it become possible to “enable” OpenSSH on Windows machines. This often creates a certain inconsistency in systems that include both operating systems. This discrepancy has frequently led me to choose more than one solution to use simultaneously.
Restic explained to a child
Imagine you have a secret album full of special stickers, and you want to protect them so no one can steal or damage them. Restic is like a magical sticker album that not only protects your stickers but also keeps them safe and organized so you can find them easily whenever you need.
Here’s how the magical album Restic works:
Special sticker copy: Every time you add a new sticker, Restic creates a special copy, like a shadow, that you can recall whenever you want. So, if you ever lose your sticker, you can always find it and put it back in place!
Locked with a magic key: The album has a secret lock that only someone with the magic word can open. This means that, even if someone finds your album, they can’t see the stickers without your permission.
Hidden archive: Instead of keeping all the stickers with you, Restic stores them in a hidden archive that can be in different places—maybe a safe at your house or even in a faraway castle (like the internet). But you always have the key to access this archive whenever you want!
A friend that helps you remember: Restic is like a friend who helps you remember where all your stickers are and keeps them in order. Even if you have lots of stickers, don’t worry—Restic always knows where to find them!
Imagine now that, for example, when you add new stickers, you end up with duplicates: identical stickers that take up space in your magical album. Restic has a special function called forget that works like a tiny organizing robot, going through all your stickers and setting aside the duplicates you don’t need.
Removes unnecessary duplicates: Restic knows you don’t need to keep a thousand copies of the same sticker. So, when you ask it to, it checks for stickers that are identical and only keeps the most recent one. This way, your album stays organized and doesn’t get cluttered with extras!
Keeps the important ones: But be careful! The magical Restic album doesn’t just throw stickers away randomly. The organizing robot knows which stickers are important and keeps the ones that might help you complete your collection. If you ever want to check an old sticker, it’s safely stored.
Room for new stickers: With fewer duplicates, you have more room for new stickers! Your magical album never gets too big or too heavy, so you can keep filling it up without worrying about getting lost among old duplicates.
The setup… my way
For Restic to work, you need an executable named restic (oh, really?!) and a couple of mandatory parameters that allow us to explore repositories and manage data. Here is the documentation which is quite scrupulous and you can check it out if you need anything in particular: Restic Docs
But let’s go in order: where do we store the saved data?
As I mentioned, I was quite impressed by the REST Server. It seemed like a convenient way to have centralized storage, a place to put the first line of backups.
So, I set up a VM with Ubuntu 22. (Yes, I know I could have used Docker, and yes, I’m aware of how it works, but when I’m trying out new software, I tend to prefer digging into it to understand how it works and what’s behind it, rather than just launching a Dockerfile and forgetting about the components – for the guide on installing the REST Server with Docker, follow the link )
First we have to decide where to put the data from Restic repositories. I decided to create a share on a NAS in the company and mount it in /mnt/restic on the ubuntu VM. It was meant to be a test, but then I left the setup like this for a while. I downloaded the rest-server executable and, fortunately for me, there was already the systemd service file to use on the official github, which looks like this
[Unit]
Description=Restic Server
After=syslog.target
After=network.target

[Service]
Type=simple
User=restic-server
ExecStart=/usr/local/bin/restic-server --path /mnt/restic --private-repos
Restart=always
RestartSec=5

[Install]
WantedBy=multi-user.target
I choose to use the —private-repos flag to prevent users from accessing each other’s repositories. This way, access is only granted when a subdirectory matching the username is specified in the repository URL. For example, as user “pippo”, I would set the repository URL to rest:http://pippo:pass-of-pippo@rest-server:8000/pippo (yes HTTP and not HTTPS, I will explain it later on).
Nothing more intuitive…
After which I enabled it in systemd:
systemd enable --now rest-server.serviceIn this way the server is available on port 8000. Free to set up a Reverse Proxy to change the config. I have kept it that way for now.
To authenticate users for accessing my rest-server, I specified them in a .htpasswd file. By default, the server searched for this file in the root of the defined directory (/mnt/restic for me). To create the file, I used the htpasswd tool from Apache’s http-tools. When adding new users, I made sure to omit the -c argument to avoid overwriting the file. Only bcrypt and SHA encryption methods were supported, so I chose -B for stronger security.
cd /mnt/restic
htpasswd -B -C 12 .htpasswd server01
For as long as I have been dealing with these toys, I have a quirk of not having a “backup” user for everything. I like each host to have its own access to its own specific directory. That way the attack surface is dramatically reduced. Complex passwords for these users saved in a password manager, and you live peacefully. I know, it’s frustrating at first but once you get used to it, the problem doesn’t exist.
Now that we have prepared “the place where the data will be saved,” we need to initialize the repository. To do this, I used Restic’s specific command
restic -r rest:http://server01:password@rest-server:8000/server01 initThe server username and password can be specified using environment variables as well:
export RESTIC_REST_USERNAME=server01
export RESTIC_REST_PASSWORD=server01
Initialization will require entering a new password. This will be used to encrypt the data within the repository.
Of course, don’t you want to do a nice test backup to see that everything works? The documentation about it is quite rich. There is even an option to do a dry-run to check that everything works. First backup: save an image.
restic -r rest:http://server01:password@rest-server:8000/server01 backup ~/Pictures/pippo.png

enter password for repository:
snapshot 345aa222 saved
I’ll spoil what happens if you restore the image from the backup: it works!
Are we sure it’s enough for us?
In addition to trying a couple of other commands and doing some restorations of files larger than an image, at some point I stopped… “What am I doing?” I mean… nice this restic, however I again found myself having to manage inline scripts to put in crontab, with presumably cleartext passwords, etc etc. As much as I liked this tool it didn’t seem to solve the management problem. Because let’s face it: as fascinating as it is to create scripts, deploy them with Ansible to the various servers by passing the right credentials and variables, a minimum of “manual” maintenance is always needed. And it’s frustrating (at least it is for me).
I definitely did not want to cross restic off the list of “tried but meh programs”. So I set out to find “companion” tools. I asked myself, “Somebody must have created a GUI, or scripts that automate it a little bit.” The open-source world is full of stuff. Often useless but inspiring. As a first step I found help scripts between bash and PowerShell. Sorts of wrappers that make it easy to configure restic backups, with attached cronjobs. Then I wandered through the various GUIs available and found Backrest.
When I found Backrest and read “web gui”, I immediately thought, “Restic centralized via web?”, “Will it have an agent or will it connect in ssh?”.
Unfortunately Backrest is still standalone, but if you take a look around the issues and PRs in Github, I am not the only one who has had that thought.
In any case, I’ve made up my mind to try it out.
Backrest is presented as a web interface built on top of restic, installable either as a container on Docker or as an application on Windows, Linux, macOS and FreeBSD. So I’ll take server01 and install the application.
From the README in Github:
# Extract the release to a subfolder of the current directory
mkdir backrest && tar -xzvf backrest_Linux_x86_64.tar.gz -C backrest
# Run the install script
cd backrest && ./install.sh
Of course, before I installed it, I took a walk through the install.sh and noticed this sections
[Service]
Type=simple
User=$(whoami)
Group=$(whoami)
ExecStart=/usr/local/bin/backrest
Environment="BACKREST_PORT=127.0.0.1:9898"

# ...

    <dict>
        <key>PATH</key>
        <string>/usr/local/bin:/usr/bin:/bin:/usr/sbin:/sbin</string>
        <key>BACKREST_PORT</key>
        <string>127.0.0.1:9898</string>
    </dict>

# ...

echo "Logs are available at /tmp/backrest.log"
echo "Access backrest WebUI at http://localhost:9898"
The script creates a backrest.service by bind it to localhost on 9898. To avoid having to install nginx during the test, I manually changed the host to the IP of server01.
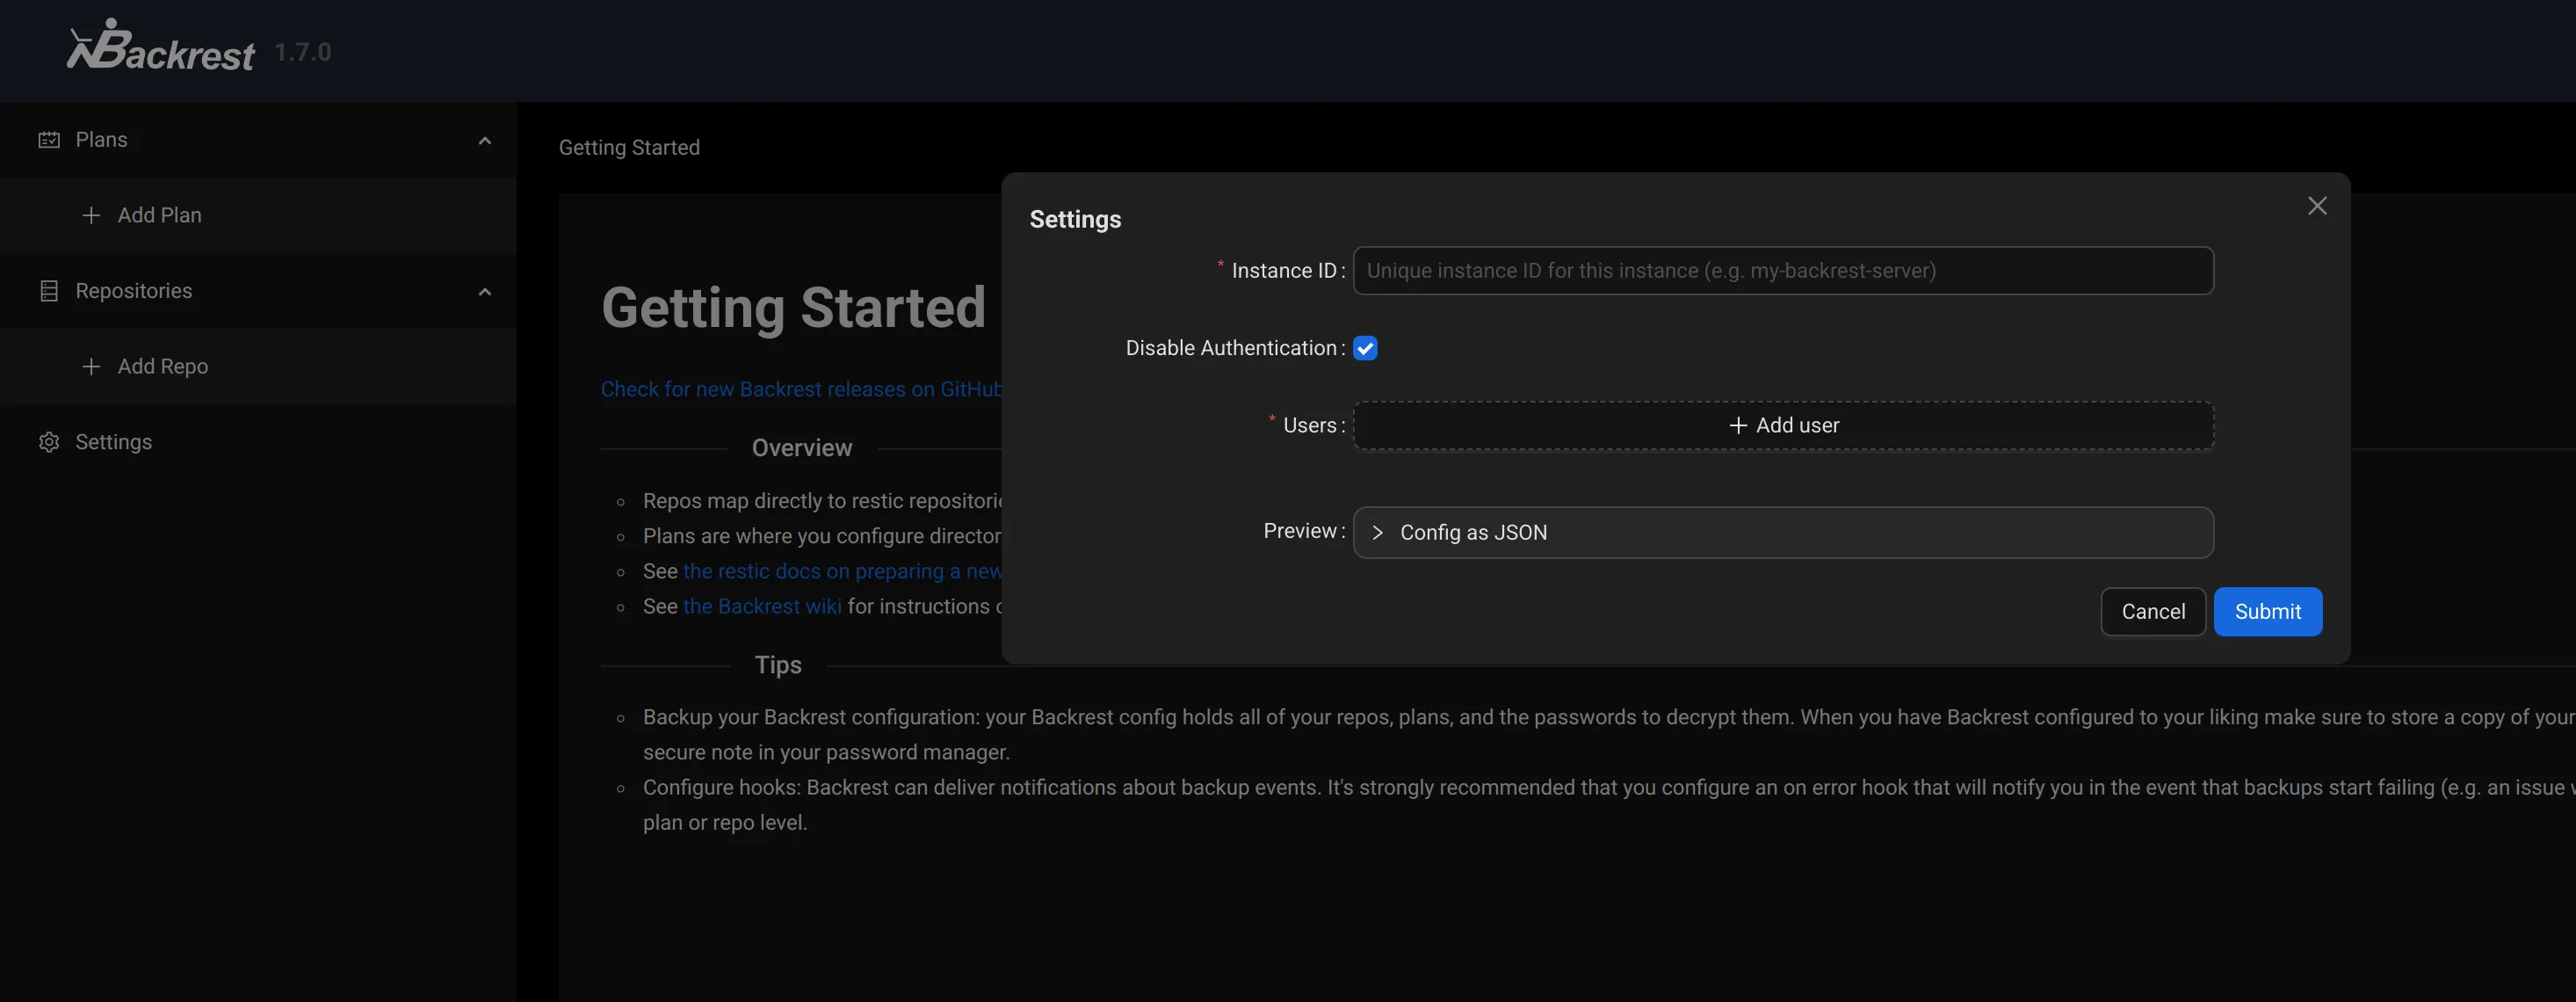
I open the browser to server01:9898 and I get this.

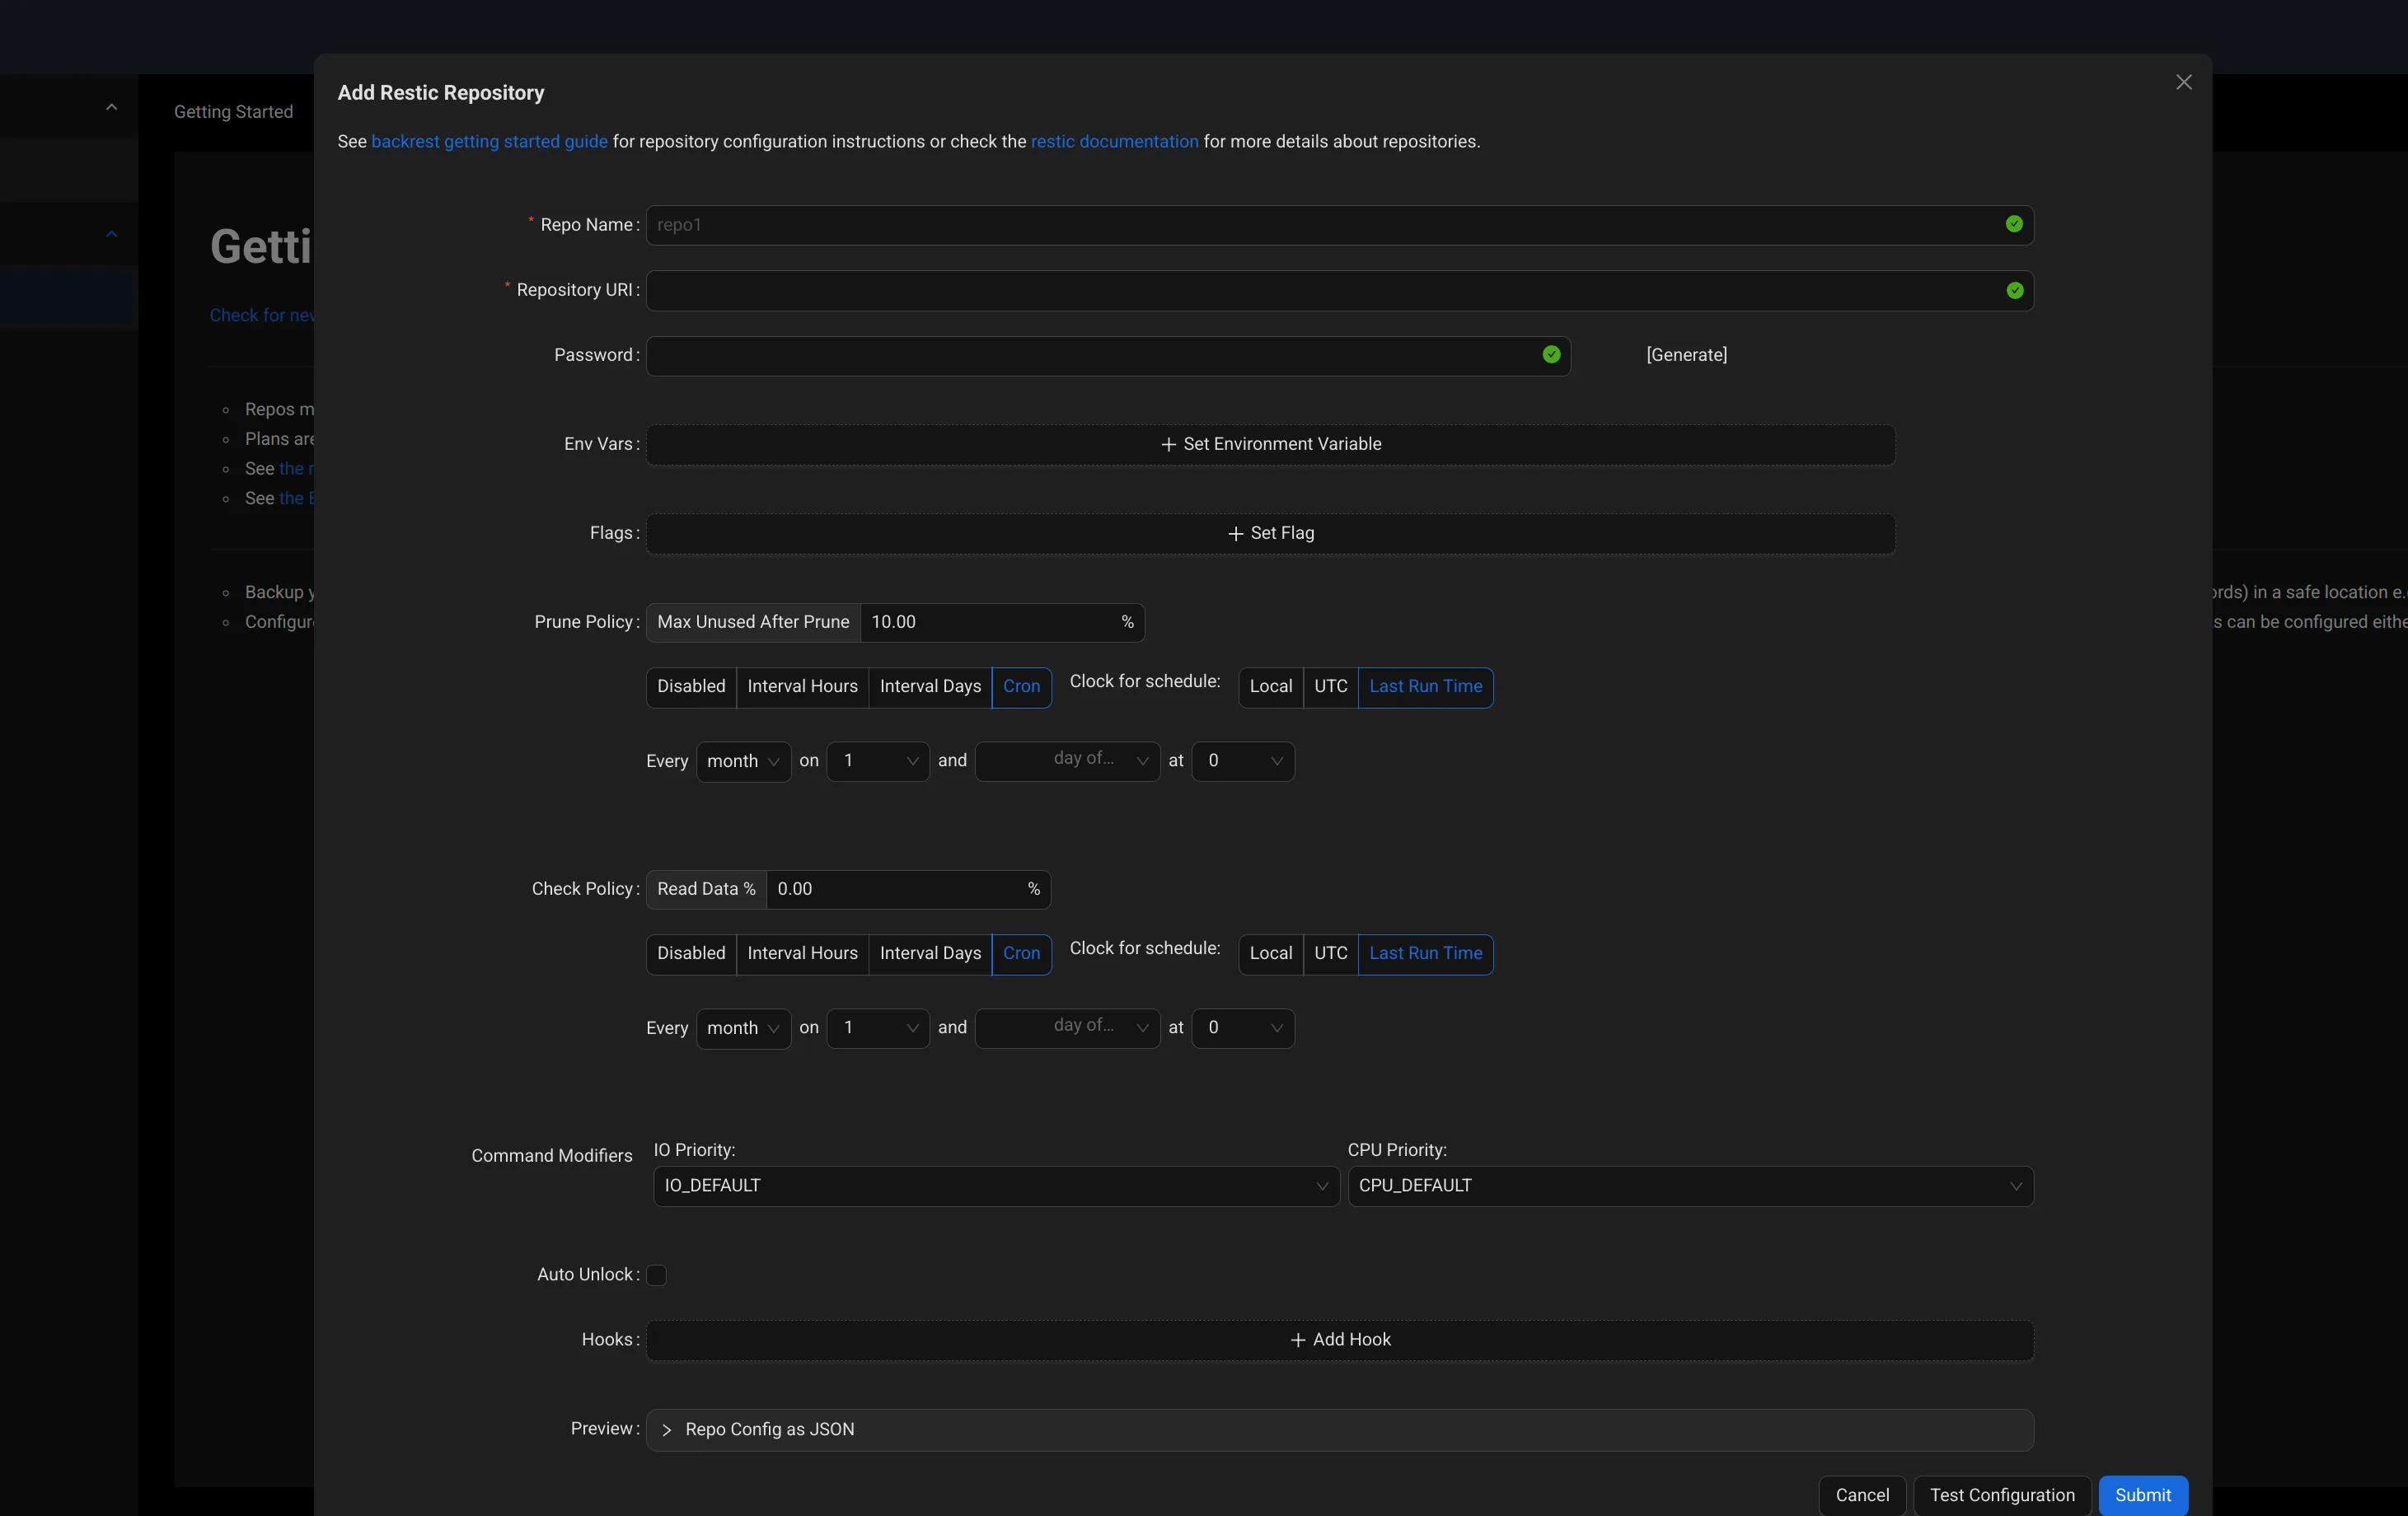
First I defined the login information under Users. Refreshed the page and authenticated. After that I found that the tool is actually set up to be hooked into multiple repositories at once (very good). So I clicked on Add Repo, and I noticed the amount of flags and Restic configurations that I had not considered

The interface should be clear. We have repos configuration, policies, and various environment variables available. I recommend you take a tour of the Restic doc to learn more about it.
After I configured the repo by entering the Rest Server address (see section before),

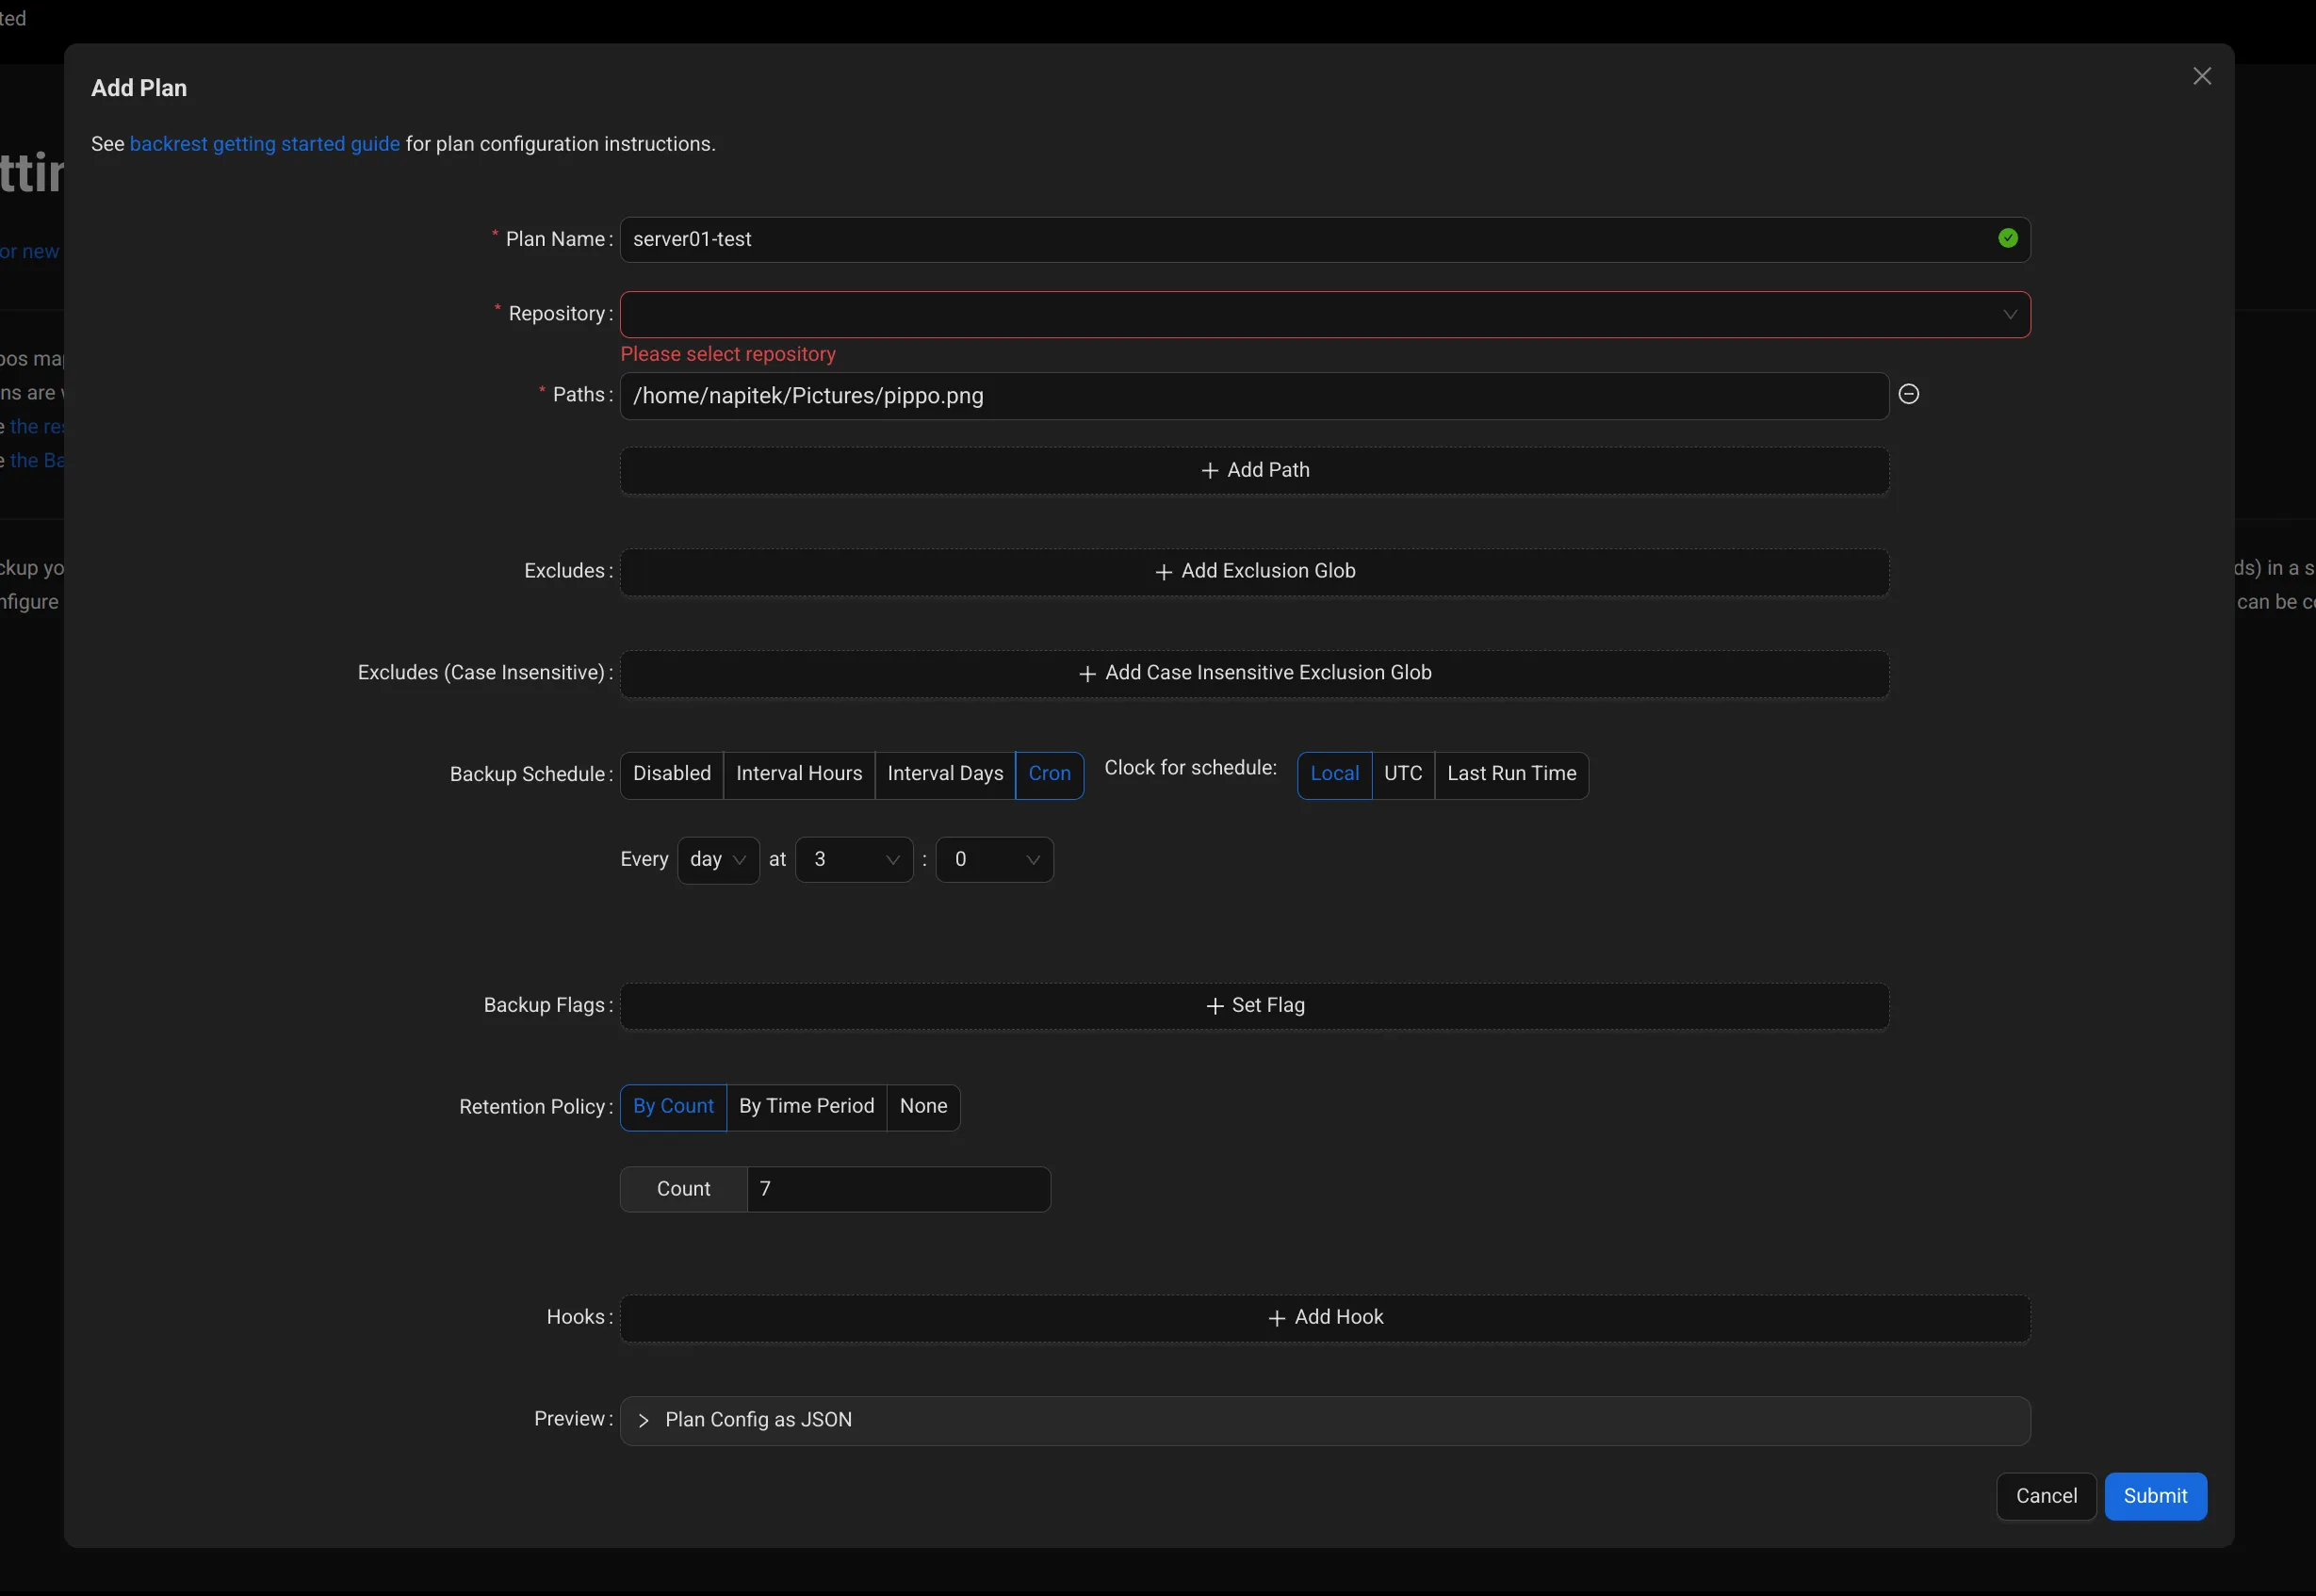
After which I entered configured the first task. The same one I had defined when I tried restic from cli.

Among the various options I included:
- Backup Schedule: 3:00 AM
- Retention Policy: >By Count 7 backups (you can also select a different retention period, based on a date for example)
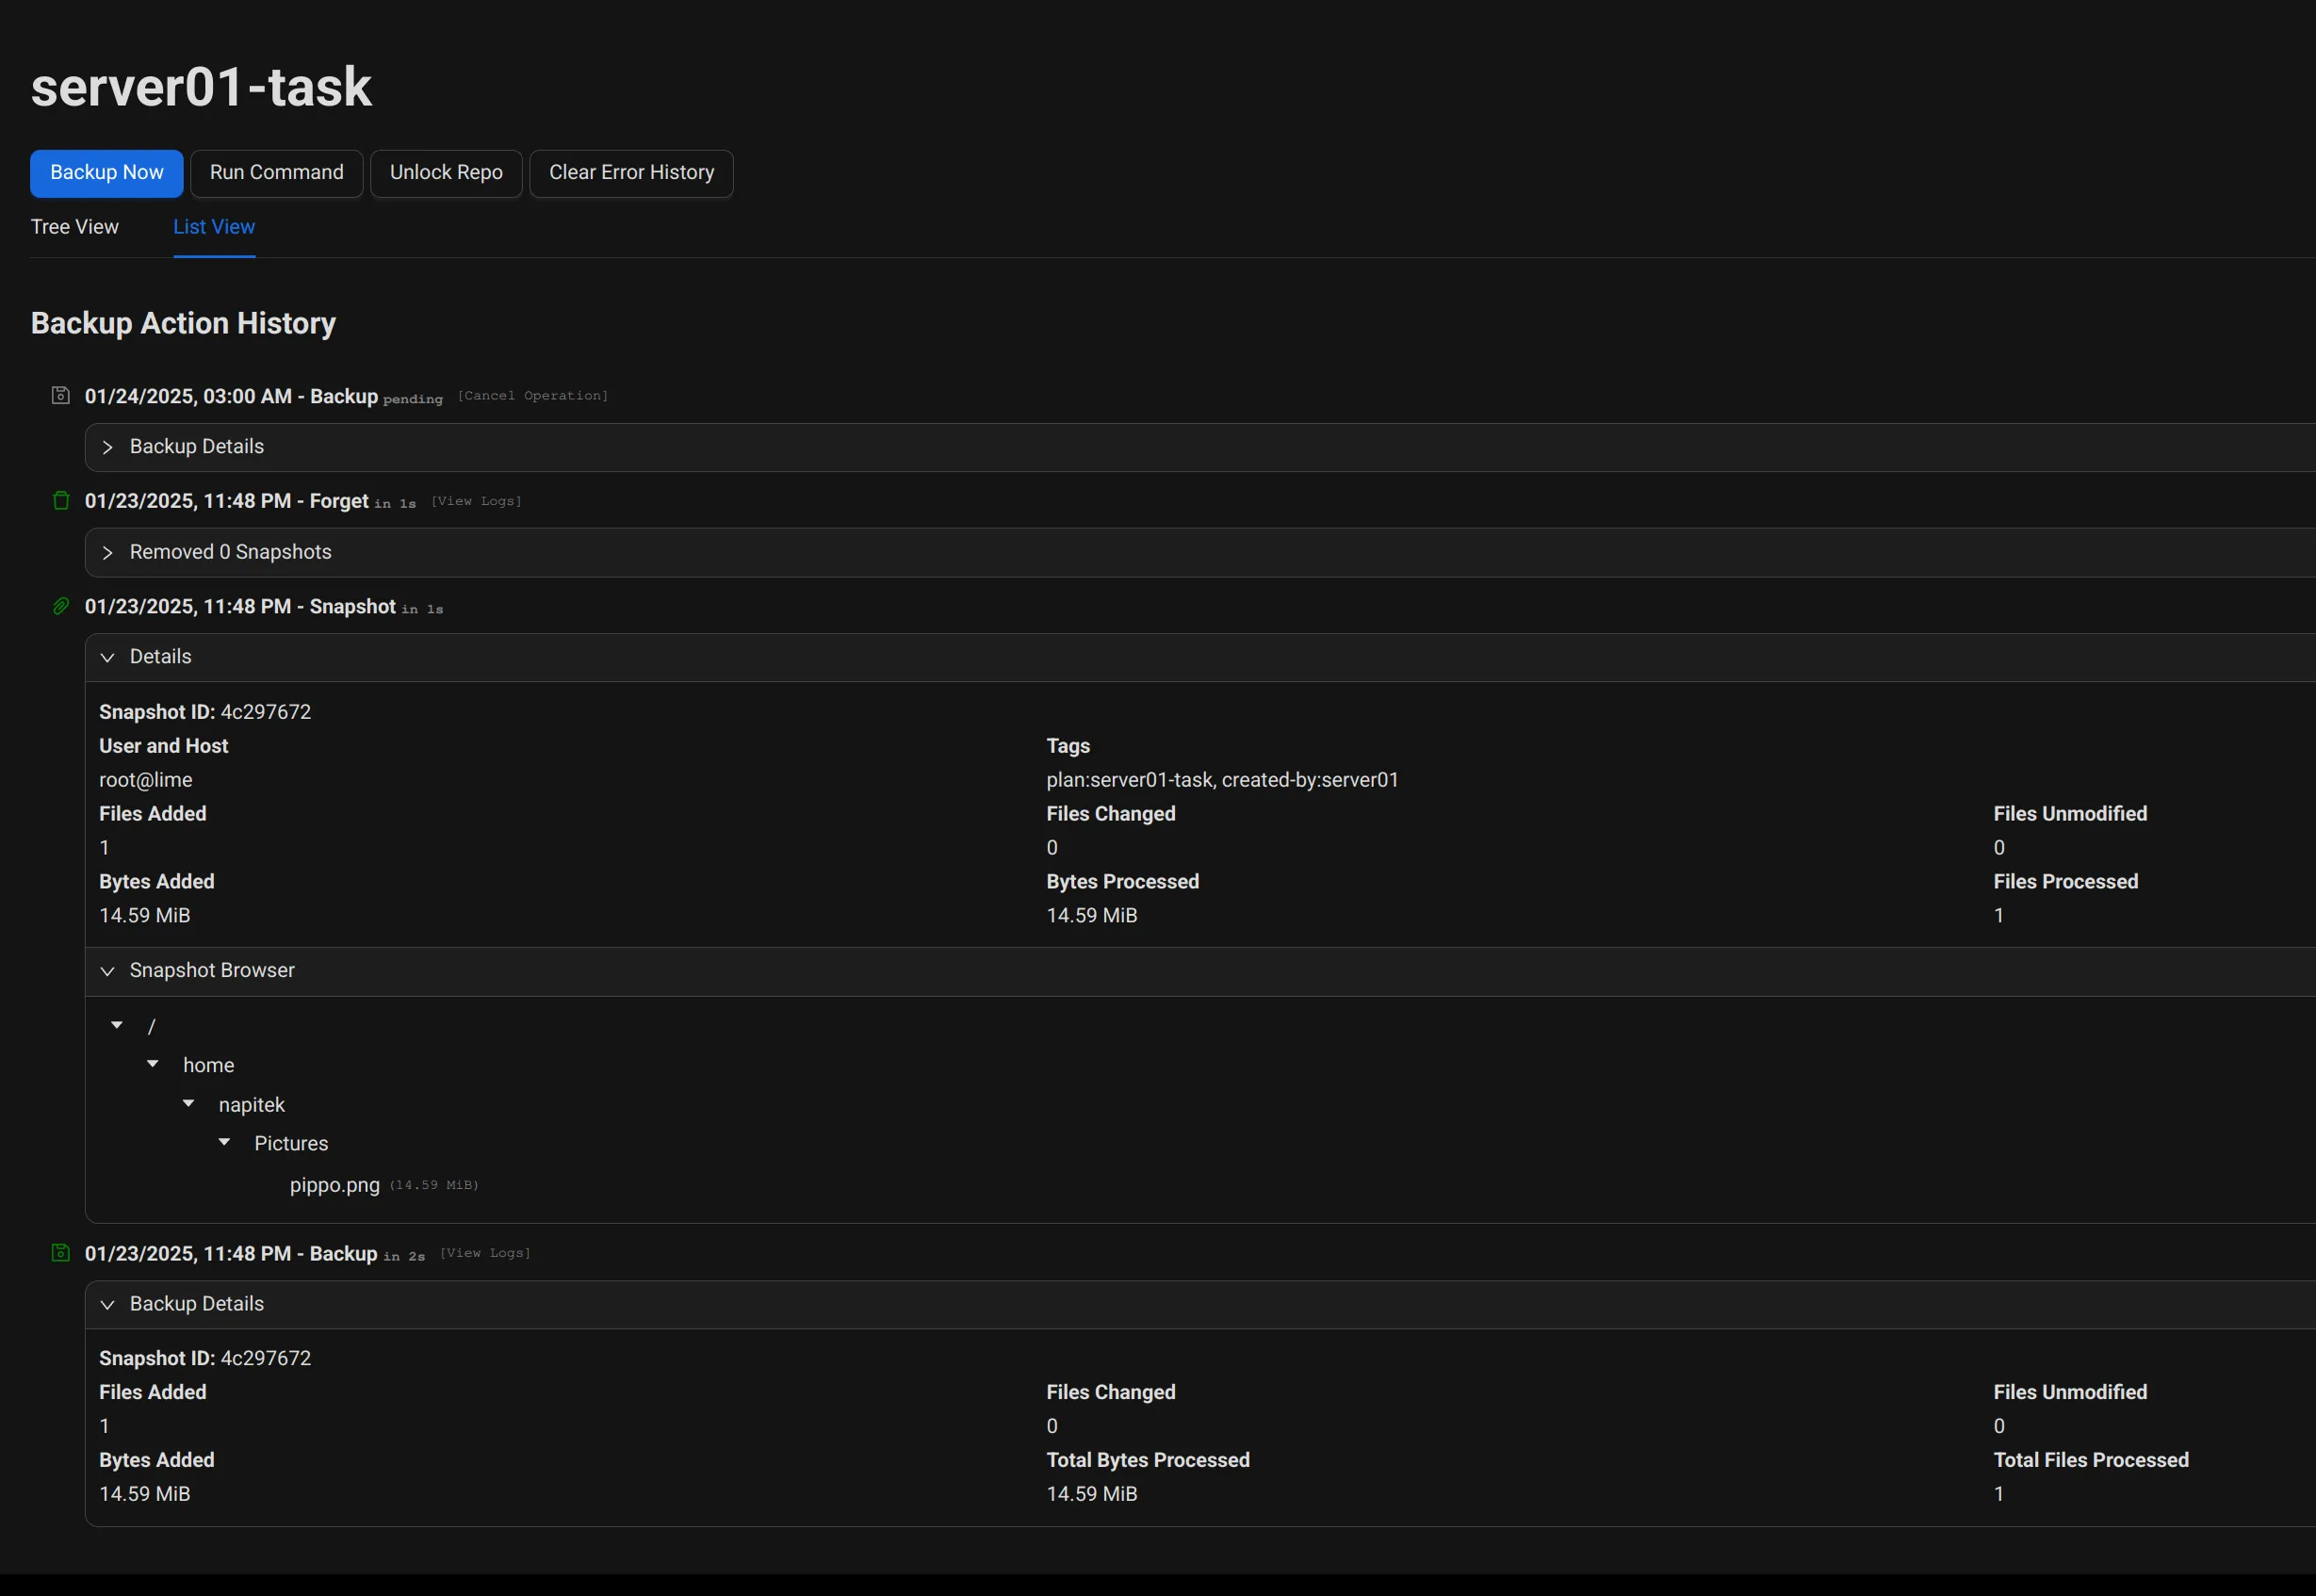
Time to launch the backup and wait for the magic…

Now let’s look at what we can do. In the Tree/List View of the task, we see a couple of interesting pieces of information. Also jumping out at us is the Snapshot Browser, which gives us the ability to explore backup files directly from the Web interface (not bad).
Anyway there are some considerations to be made:
HTTP/HTTPS: I used http for testing. I promised to explain why I chose to use HTTP over HTTPS. Simple: because it adds an extra layer of encryption that does nothing but slow down the execution of backup tasks. The repo is encrypted by itself, and to access the data you have to open it with authenticate. The encrypt happens client-side, so data is encrypted before being sent to the server. The risk is obviously a malicious attack that reads the connection metadata when it is sent to the server. So I will probably change to HTTPS in the future, but for now we are at the testing stage
File Backup only: Restic and then Backrest do not have direct bindings with databases, or with hypervisors. This means that they rely only on concrete file backups. For databases the problem is minor: usually there is an export or backup of the same db and these are taken as “backup files.” The problem arises with hypervisors: it is not always obvious to be able to access the vmdk, vhd/vhdx, qcow2, raw files of virtual machines.
The backup is not centralized: Backrest does not currently support a client-server system, such as that of other centralized solutions. This means that for each host, it will need to be installed and configured. There is of course the possibility of exporting/importing a json configuration file, which will still need to be edited as needed. There is, however, an issue in github that promises some sort of multihosting management. We’ll have to see… issue.
We are still at an intermediate stage of the configuration. There is definitely room for improvement, but I wanted to share this test. I am also considering adopting an S3 server (Minio for example) to use as a “repository” for restic, and abandon the rest server idea. I don’t know how much adopting a storage system like minio can become overkill, and get out of the topic of everything. I certainly find restic together with backrest a very viable open-source solution to implement even at the business level.
